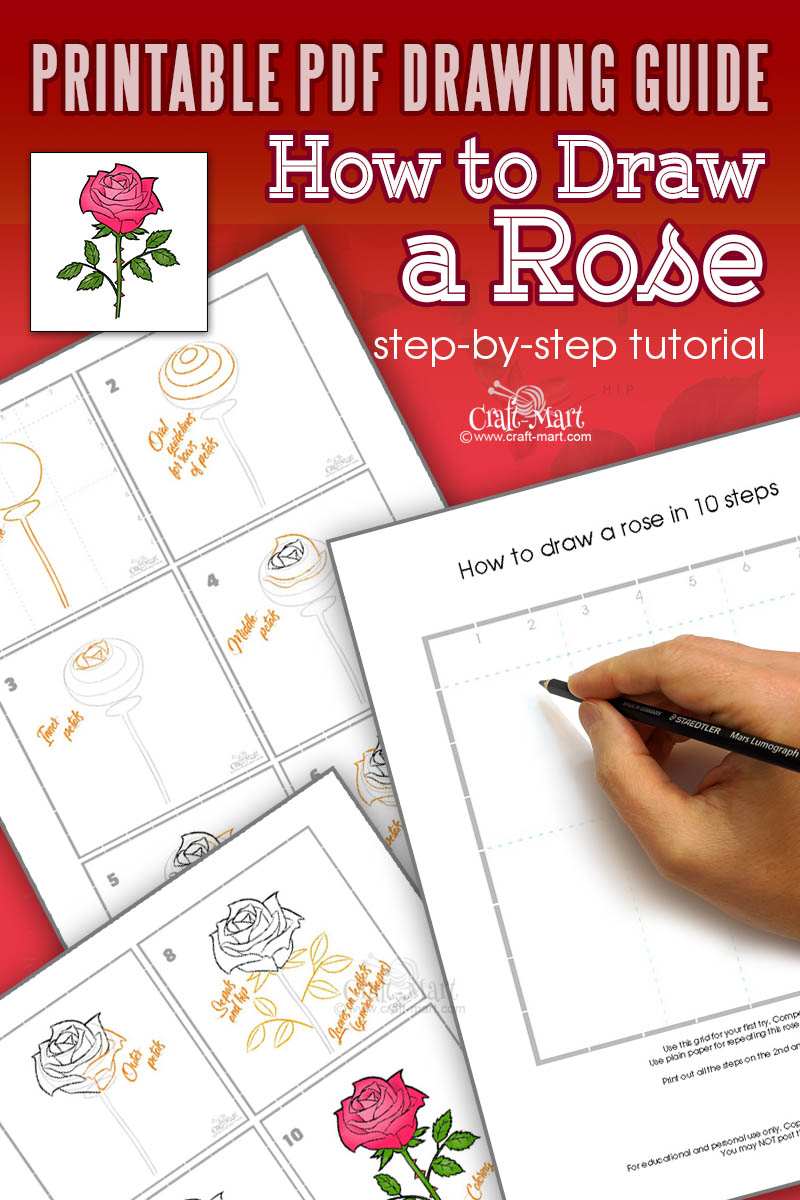
Drawing a rose presents a few challenges for beginners. In this “How to draw a rose” step-by-step guide we tried to make the rose flower drawing process easy enough to follow even for complete beginners yet not excessively oversimplified.
Using simple initial shapes for drawing a rose has been the traditional way of learning to draw this beautiful flower. In our tutorial, we also use a grid frame to make the first step of sketching a rose’s outlines easier to position it on the canvas. Drawing rose flowers takes practice, patience, and a bit of information about the parts of this beautiful flower.

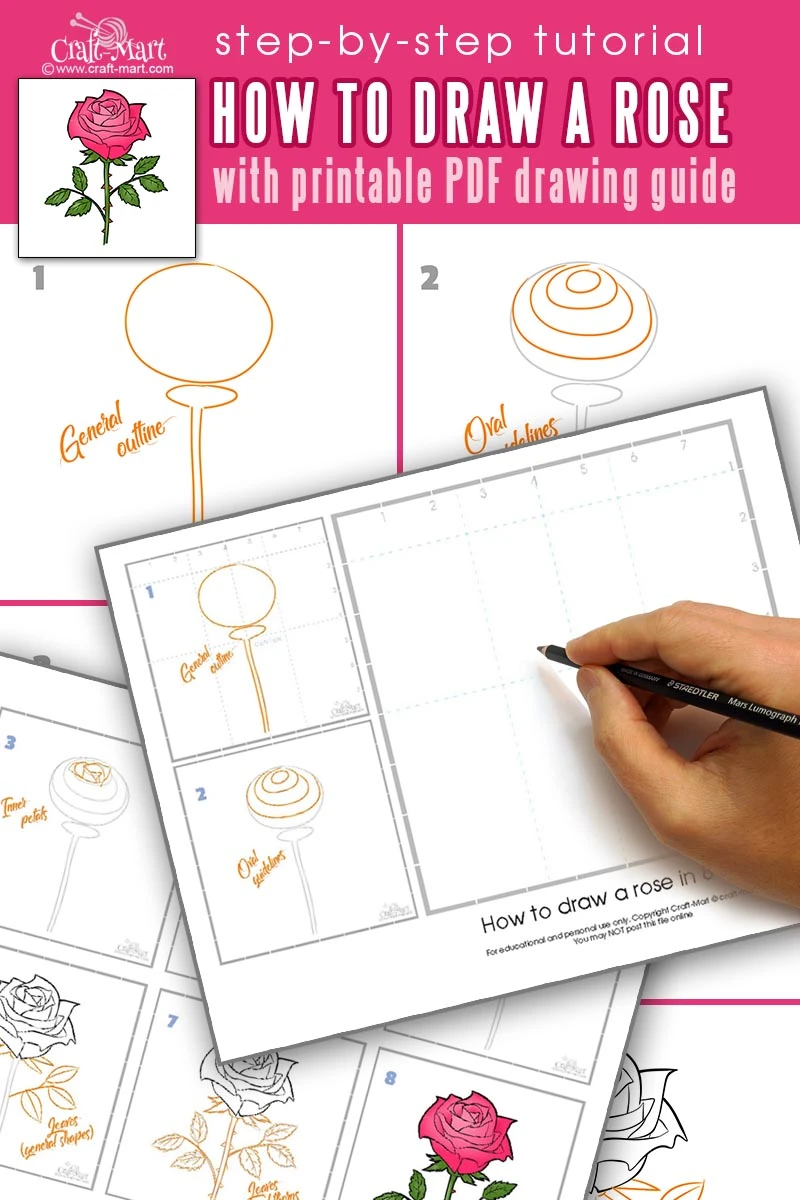
For practicing we provide a free downloadable PDF template with step-by-step drawing instructions. Keep in mind that each time you repeat your rose flower drawing exercise, you’ll be getting better and better. It is very similar to how small children learn to write letters. If you managed to learn how to write then you already know the system – repeat, repeat, repeat…
Before we actually start drawing a rose flower let’s learn some useful facts about the rose parts that we’ll be dealing with in our exercises.

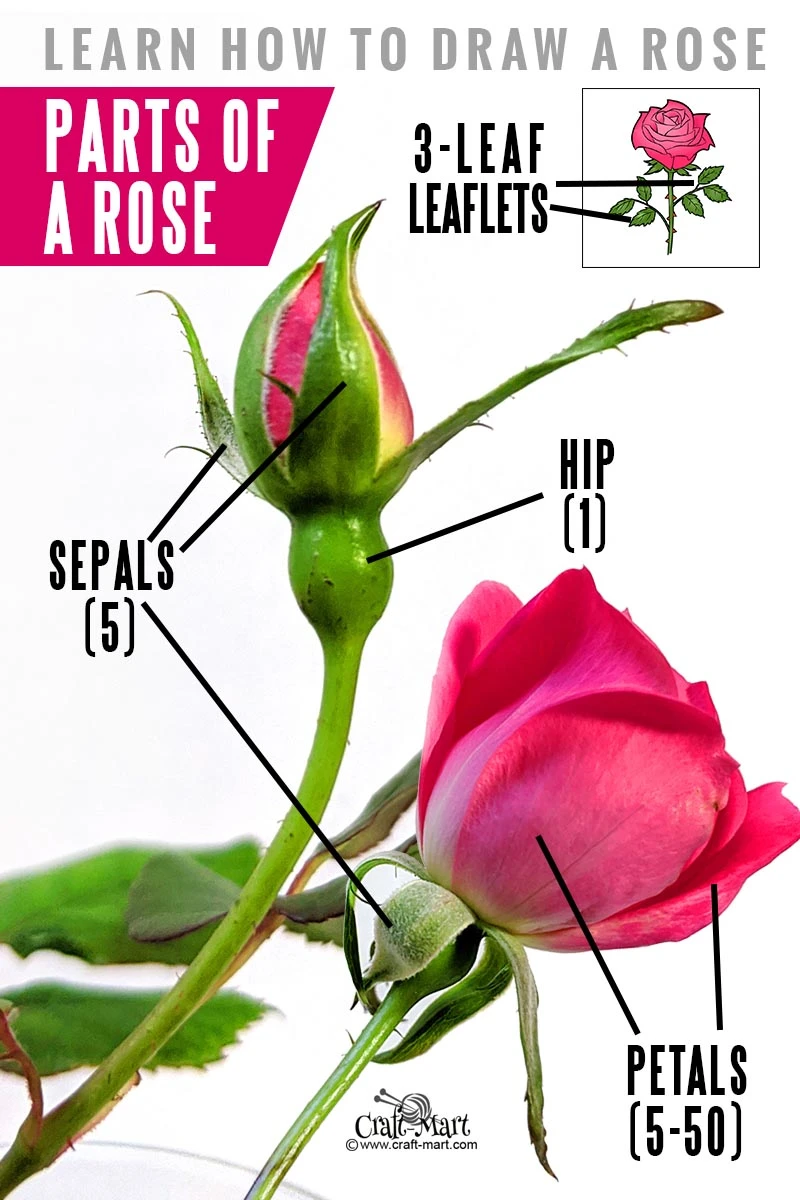
Sepals
Sepals are green, leaf-like coverings that protect the rosebud before it blooms. As a flower opens, the sepals turn down and may eventually be hidden by the flower. Note that roses have 5 (five) sepals.
Petals
Before a rose flower opens, all petals are hidden behind sepals. A single rose flower may have from 5 to 50 petals depending on the particular type. Most commonly, roses with multiple rows of petals have 3-5 petals per row.
Leaves and Leaflets
Roses don’t have single leaves growing directly from the steam. The leaflets closest to the rosebud usually have 3 leaves while the rest of the leaflets may consist of 5 or even 7 leaves closer to the base of the steam.
Hip
Hips serve as a base for rose flowers. Sepals and petals are attached to it.
(Rosehips are my favorites! Why? Read here…)
*Read more about the rose flower structure here.
Now it’s time to get your drawing paper and pencils to learn how to draw a rose flower
*For the best results download and print our rose-drawing step-by-step template (scroll down to the end of this post to download)
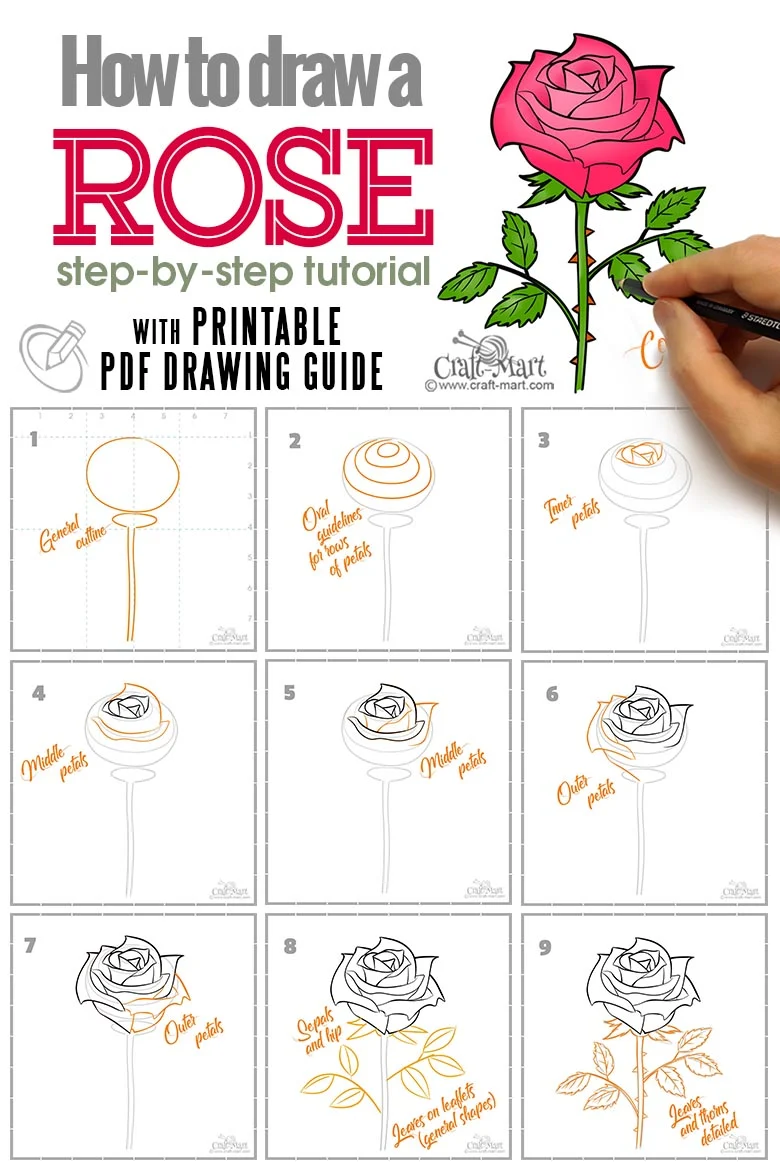
Step 1
Start your rose flower drawing by making 3 general outlines: for the rosebud make a circle, for the hip and sepals make an oval, and for the steam draw a slightly curved double line along the central axis. Try drawing these lines using light pressure since these are only your guidelines for the final drawing.
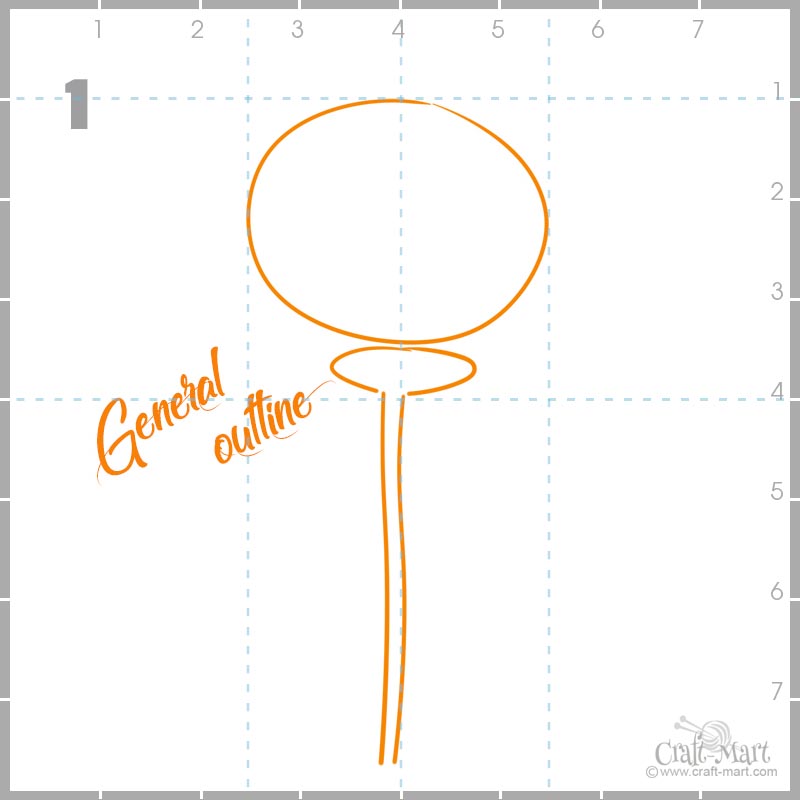

Don’t try making a perfect circle and oval in one sweep – two or more lines would be fine at this stage. Just stay within or close to the dashed lines of the drawing grid.
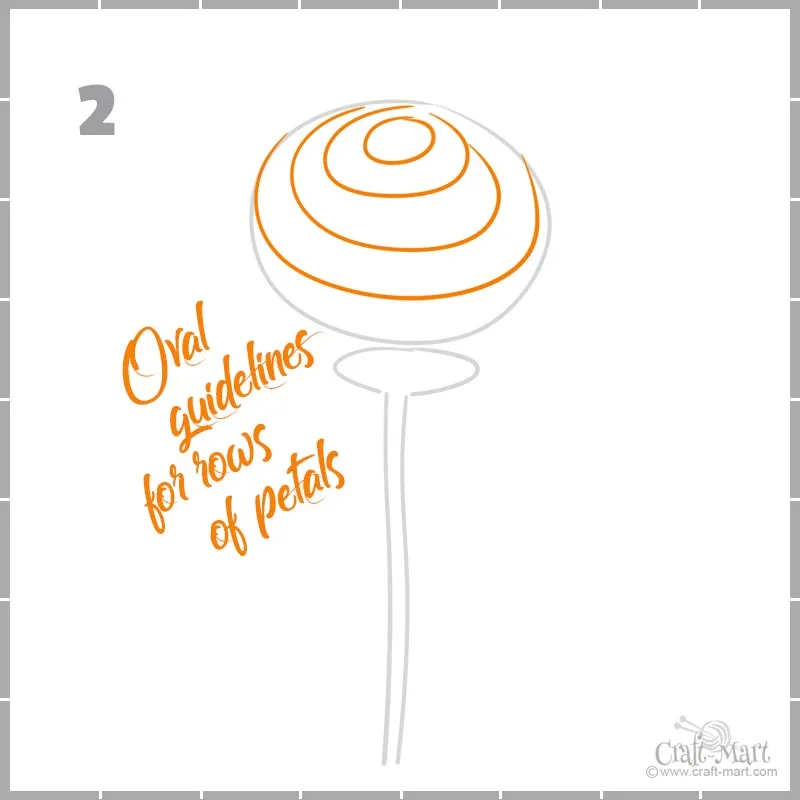
Step 2
How to draw rose petals? Draw four (4) ovals starting from the bottom. Each oval will be serving as a guide for a layer of petals. As with the previous step, use light pencil pressure for these oval guidelines.

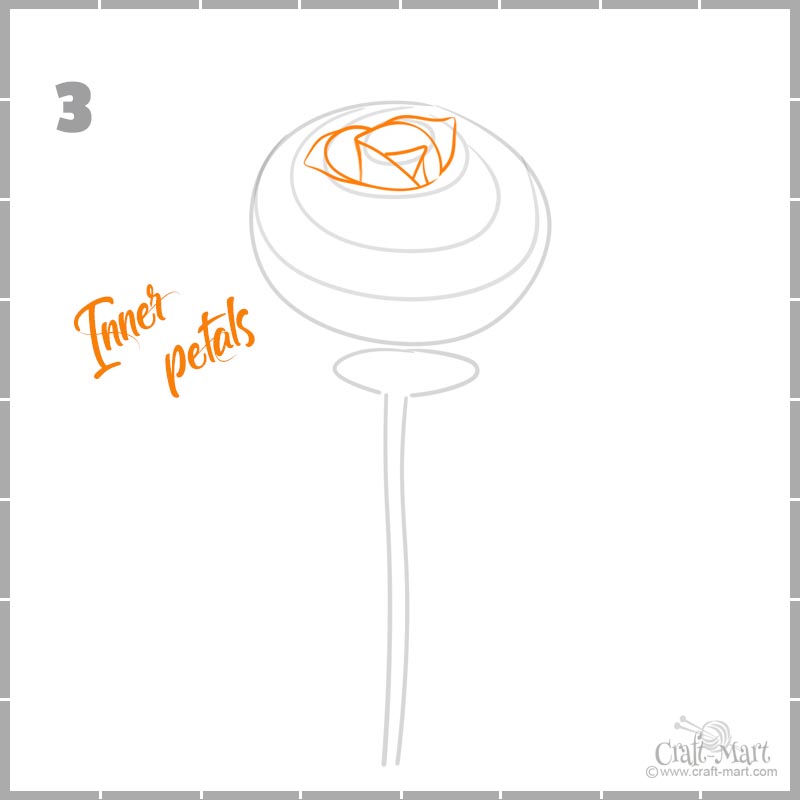
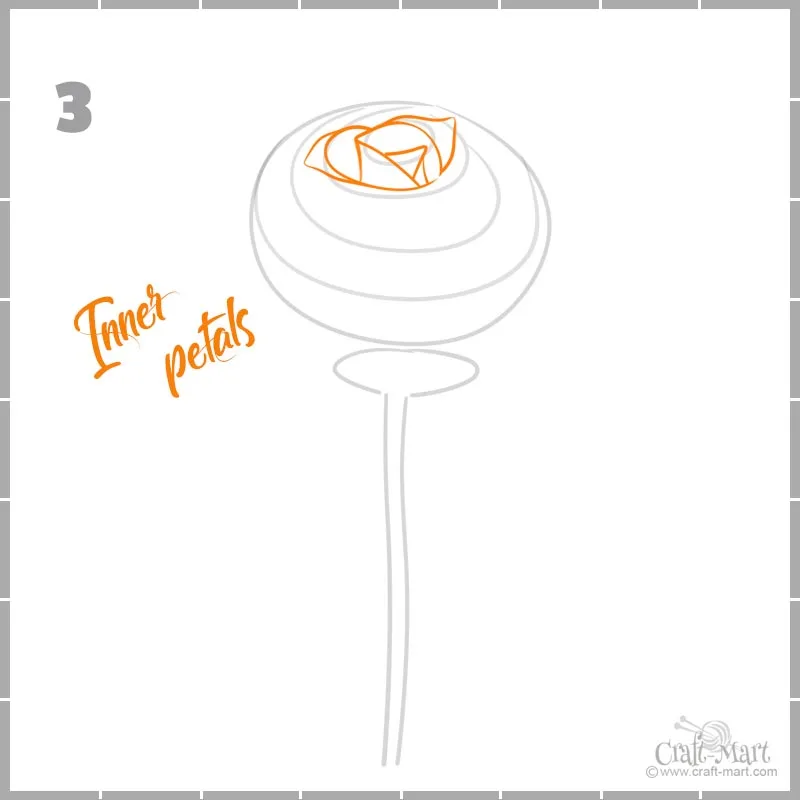
Step 3
Start drawing rose petals beginning from the top central part. Make your lines darker this time. Add two petals for the second layer to the left and to the right of the central part.
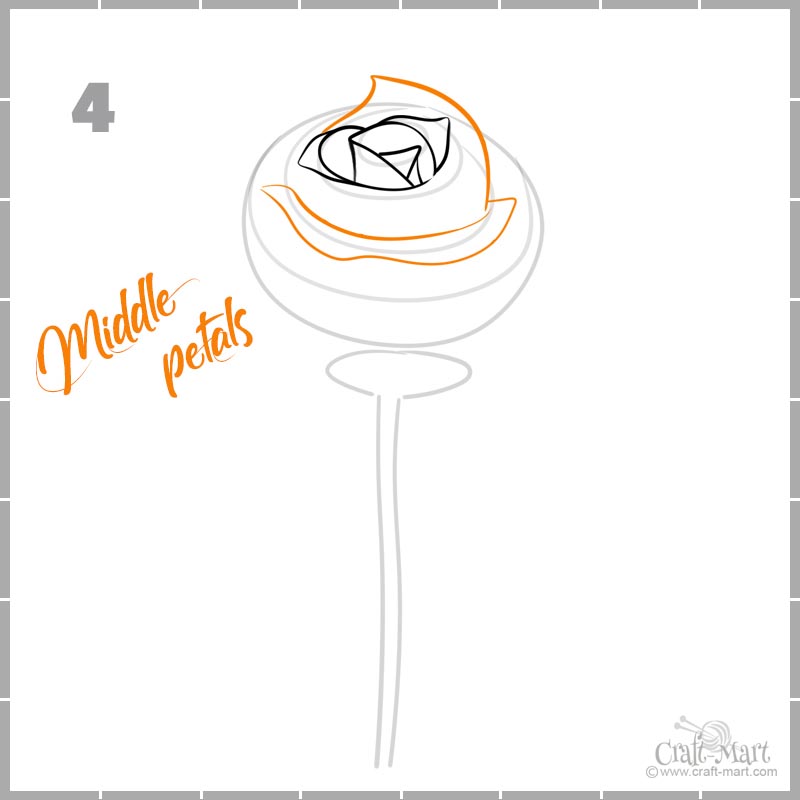
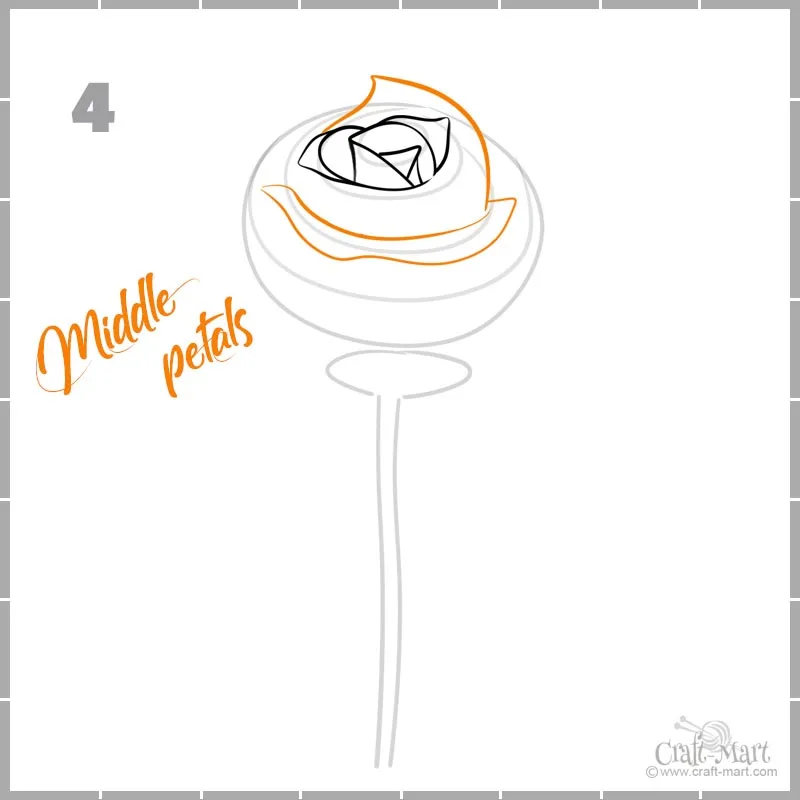
Step 4
Add the third rose petal for the second layer. Draw one long horizontal petal around the guideline of the third layer. Then draw one more petal above. You are almost done with the third layer.
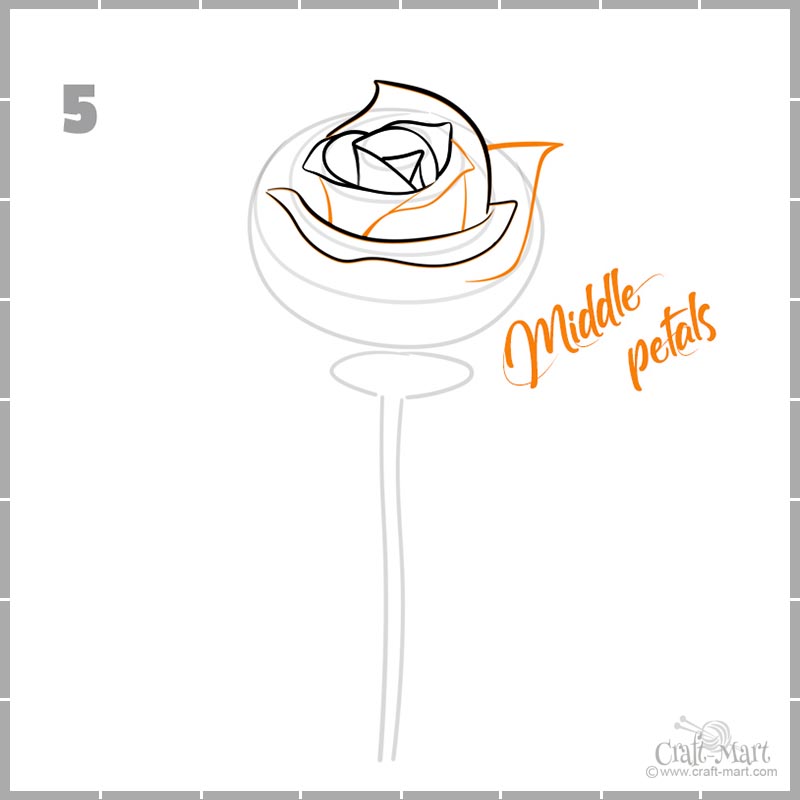
Step 5
Before we finish the third layer of rose petals let’s finalize the second layer. Draw one more 2nd-layer petal in the middle and don’t forget a couple of vertical lines there. Finally, add one more 3rd-layer petal on the right. Done!

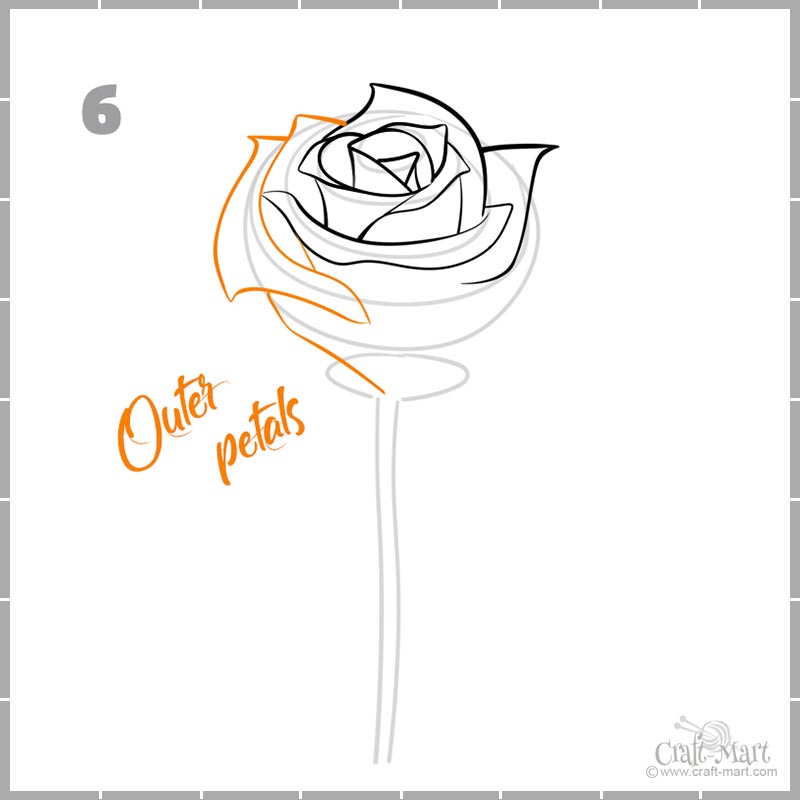
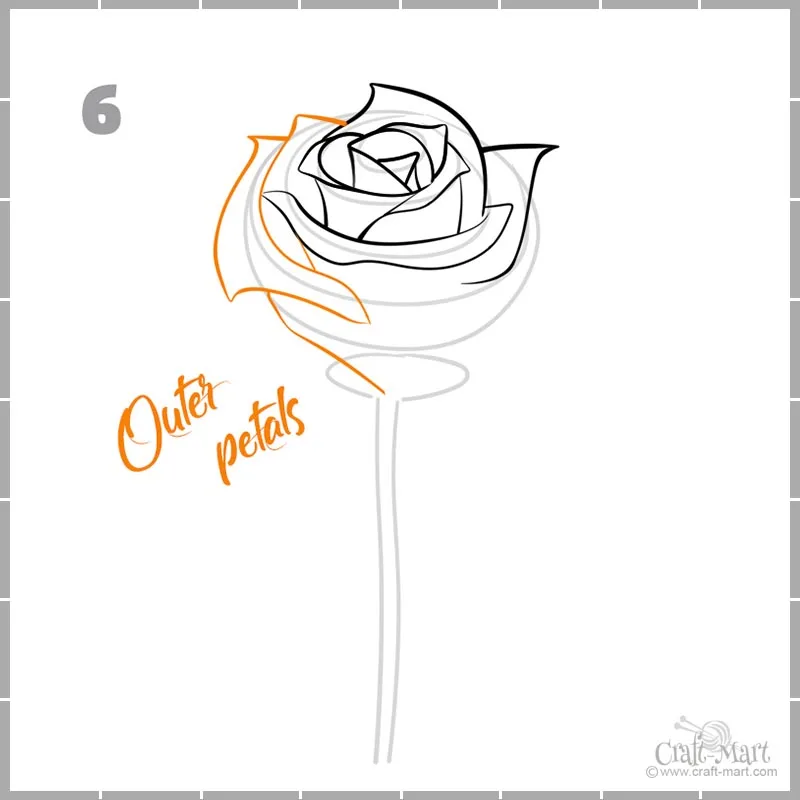
Step 6
Start drawing a couple of big outer rose petals on the left side.
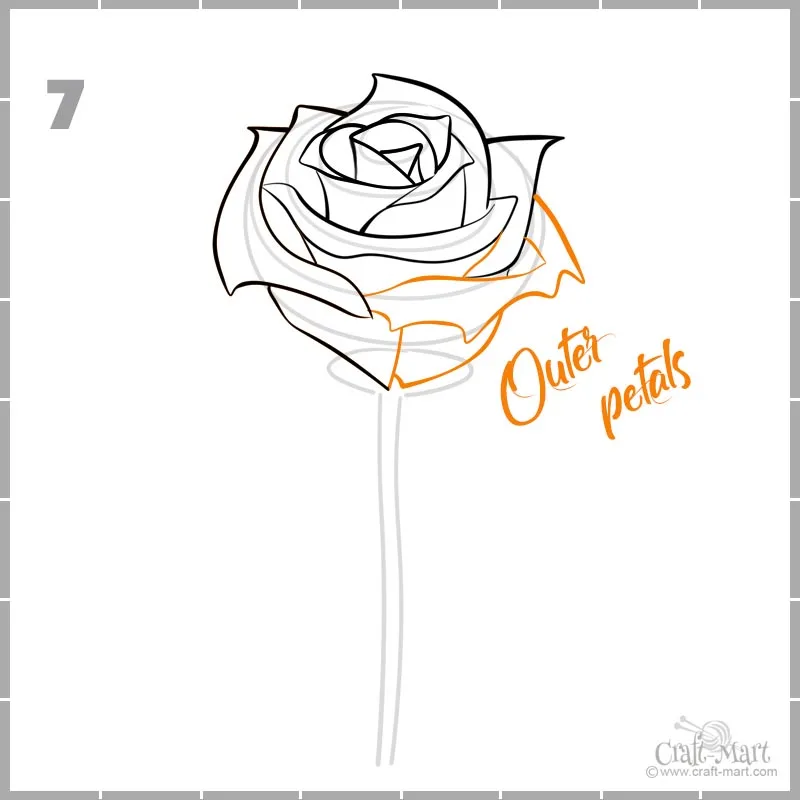
Step 7
Add one more outer petal on the right and don’t forget to draw the round bottom of the rose.

Step 8
Remember those Sepals and leaflets with 3 leaves? Now it’s time to draw them but not in detail. From our point of view, we can see only 4 sepals, so we should draw only 4 because the 5th one is behind the rosebud. Next, draw the hip and steams for leaflets.


Don’t push too hard on your pencil when drawing leaves – later you’ll need to draw “teeth” on the leaves’ edges if you’d like your rose to look more realistic.
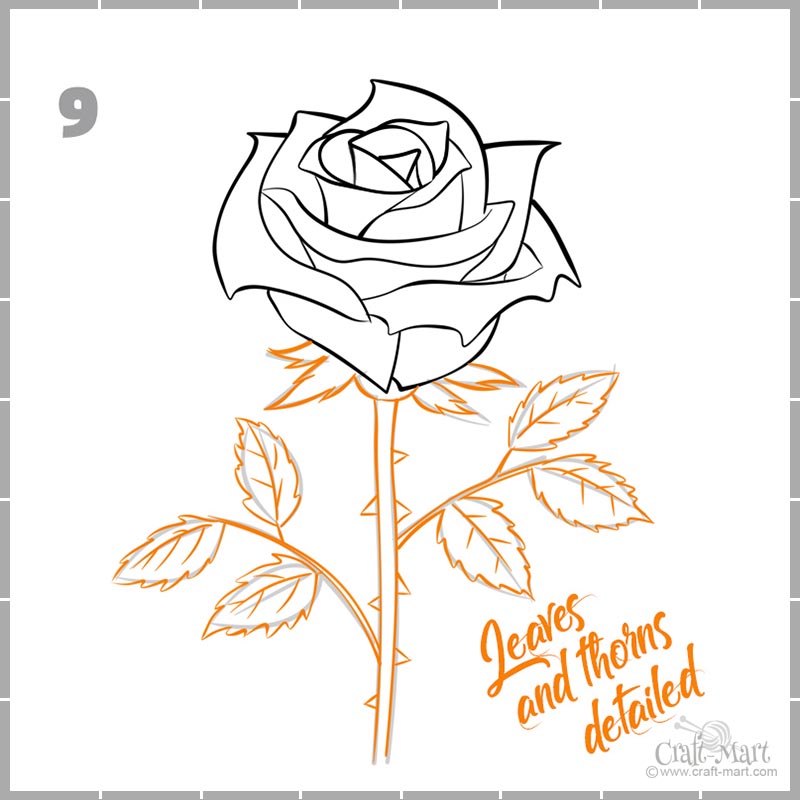
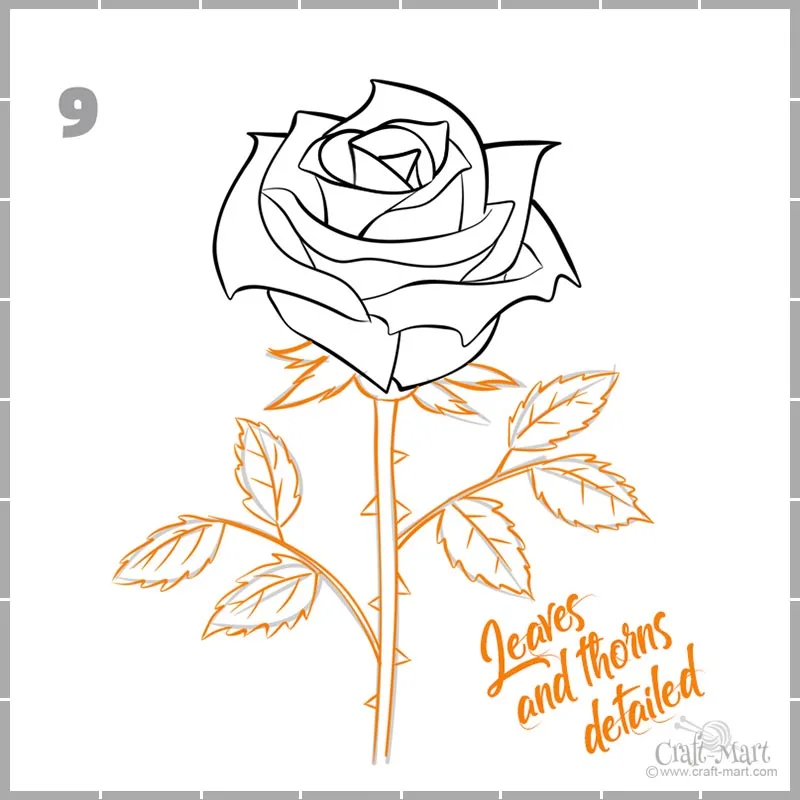
Step 9
The final steps are always fun – your drawing comes to life! Thorns on the rose steam are sort of a trademark of this beautiful flower. Sharp thorns and jagged edges of the rose leaves create an effective juxtaposition to the delicate beauty of the rose flower.
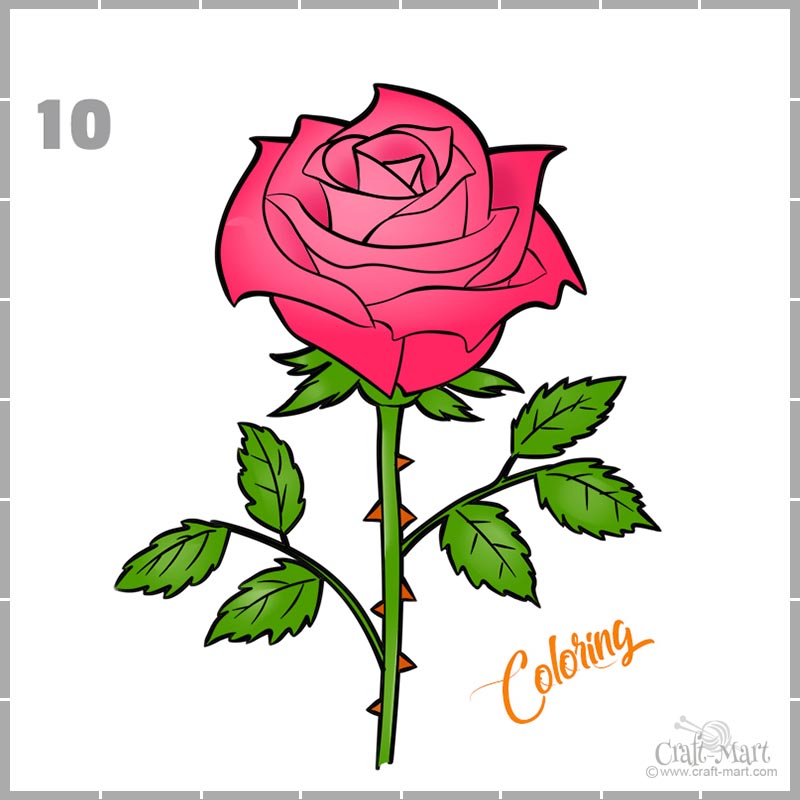
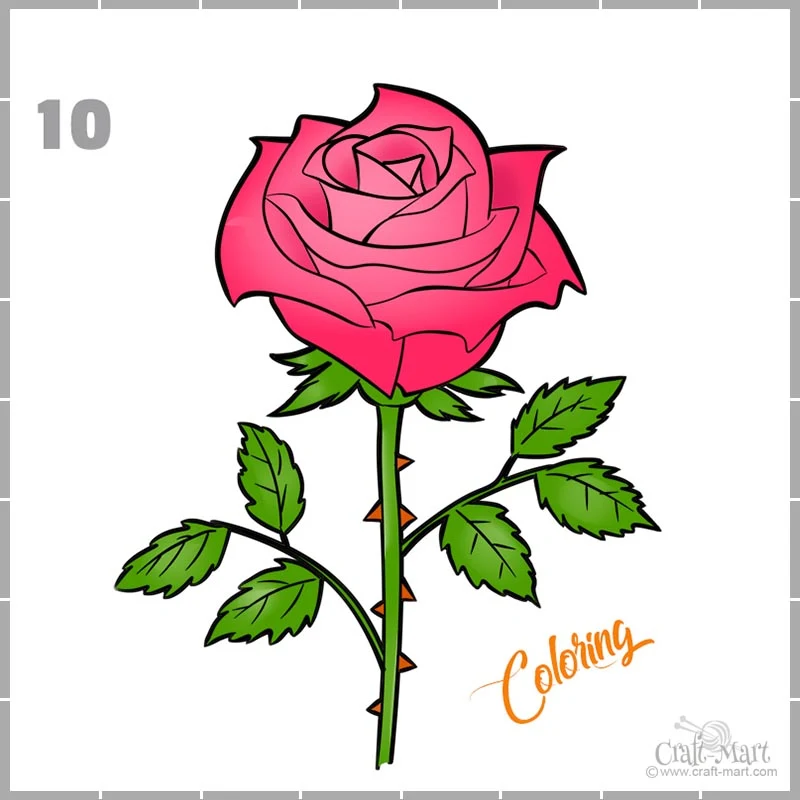
Step 10
Coloring is even more fun! Use any color you want: red, yellow, pink… We’ll try to add a special tutorial on coloring later. Right now the main goal is learning the steps of drawing a rose flower.
We hope that you liked our tutorial on drawing a rose. Don’t forget to download our 10-step easy drawing printable guide (click on the image below)!
If you liked our drawing a rose tutorial, you may also like our post “How to Draw Flowers“.
The great Swiss educational reformer Johann Heinrich Pestalozzi ( 1746 -1827 ) had an astonishing rate of success with teaching small kids many subjects through drawing. He used to say: “Through drawing things around them, children have a much better understanding of the World…”

We encourage you to download our guide and practice several times. Before you know you’ll be sketching a rose like this:

Remember, for successful rose drawing results you need to look at real rose flowers, study them, and then practice, practice, and practice!
Knowing the basic facts about roses such as the number of sepals or leaves will help your final rose drawing look more realistic.
*Of course, you don’t have to learn the complete rose anatomy terminology!