It is time to learn how to knit an infinity scarf! When you are done with mastering casting on stitches and learning the basic knit stitch, it is time to learn a very simple but beautiful rib pattern – Fisherman’s Rib Knit Stitch.
We explain how to knit an infinity scarf for beginners with a step-by-step tutorial. In fact, it is an easy pattern that uses only knit and slip stitches.
It is a very fast and stretchy rib so you can use it for a variety of easy knitting projects such as infinity scarves, hats, and headbands (ear-warmers). As a matter of fact, the best practice is repetition.
So, we suggest creating something warm and useful that you can wear during the cold winter months or give as a gift to your family, while you practice this easy pattern for your future knitted infinity scarf.
About our pattern for the infinity scarf
A few reasons why you should learn the Fisherman Rib Knit Stitch
- It is a very easy knitting pattern;
- You will repeat two basic stitches;
- This knitting pattern looks sophisticated but you can learn it very fast;
- There is no counting of stitches;
- You can use it for a variety of projects, including popular knitted infinity scarves;
- Both sides of fisherman’s rib knit stitch look the same (great for scarves)
- The scarf is very puffy and warm (if you use chunky yarn);
- It is a “fast” knitting pattern so you can finish this infinity scarf in a few hours;
- This classic heirloom pattern is a great addition to your knitting library.
This timeless pattern is also known as brioche rib, textured rib, English rib, or fisherman’s rib. Though some tutorials would teach fisherman rib differently, you end up with the same result!
Furthermore, it is an ideal pattern for infinity scarves or other similar projects as it is stretchy and looks the same on both sides, so it is reversible.
Continental vs English Style Knitting
We are going to teach you how to knit faster: the yarn is controlled by your left hand and the working needle is in your right hand.
There is no wrapping of yarn around the needle with your right hand (as in English/American style) so it makes it very speedy, super-simple, and easy to learn for beginner knitters.
The main difference in English vs. Continental knitting is the way the yarn is wrapped around the right needle before it is pulled through to knit a stitch. In English-style knitting, the action is throwing the yarn and wrapping it around the needle.
On the contrary, in Continental-style knitting, the action is picking the yarn with your right needle.
As an added benefit, it is much easier on your wrists in the long run and won’t strain your joints. Moreover, when you learn basic stitch techniques, they will stay in your memory. So it is easy to pick up where you left off several days, years (or decades) later.
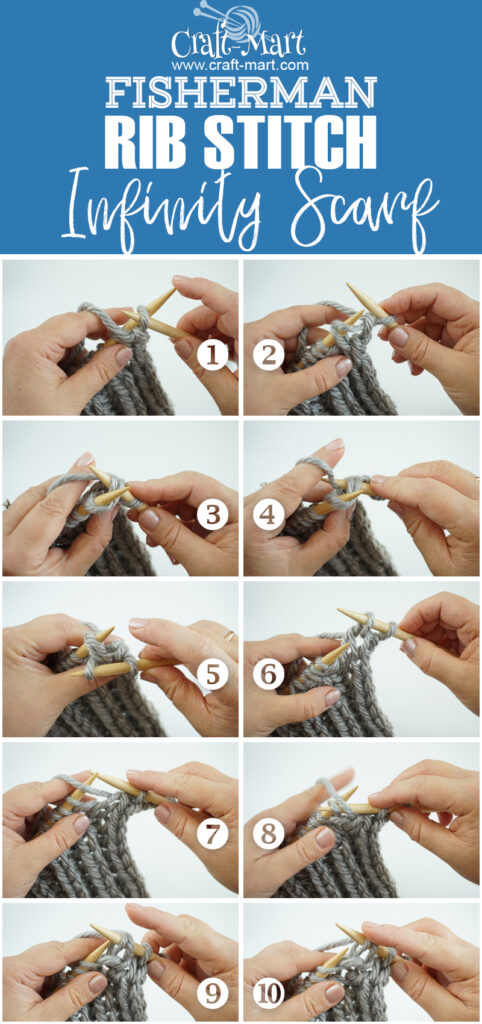
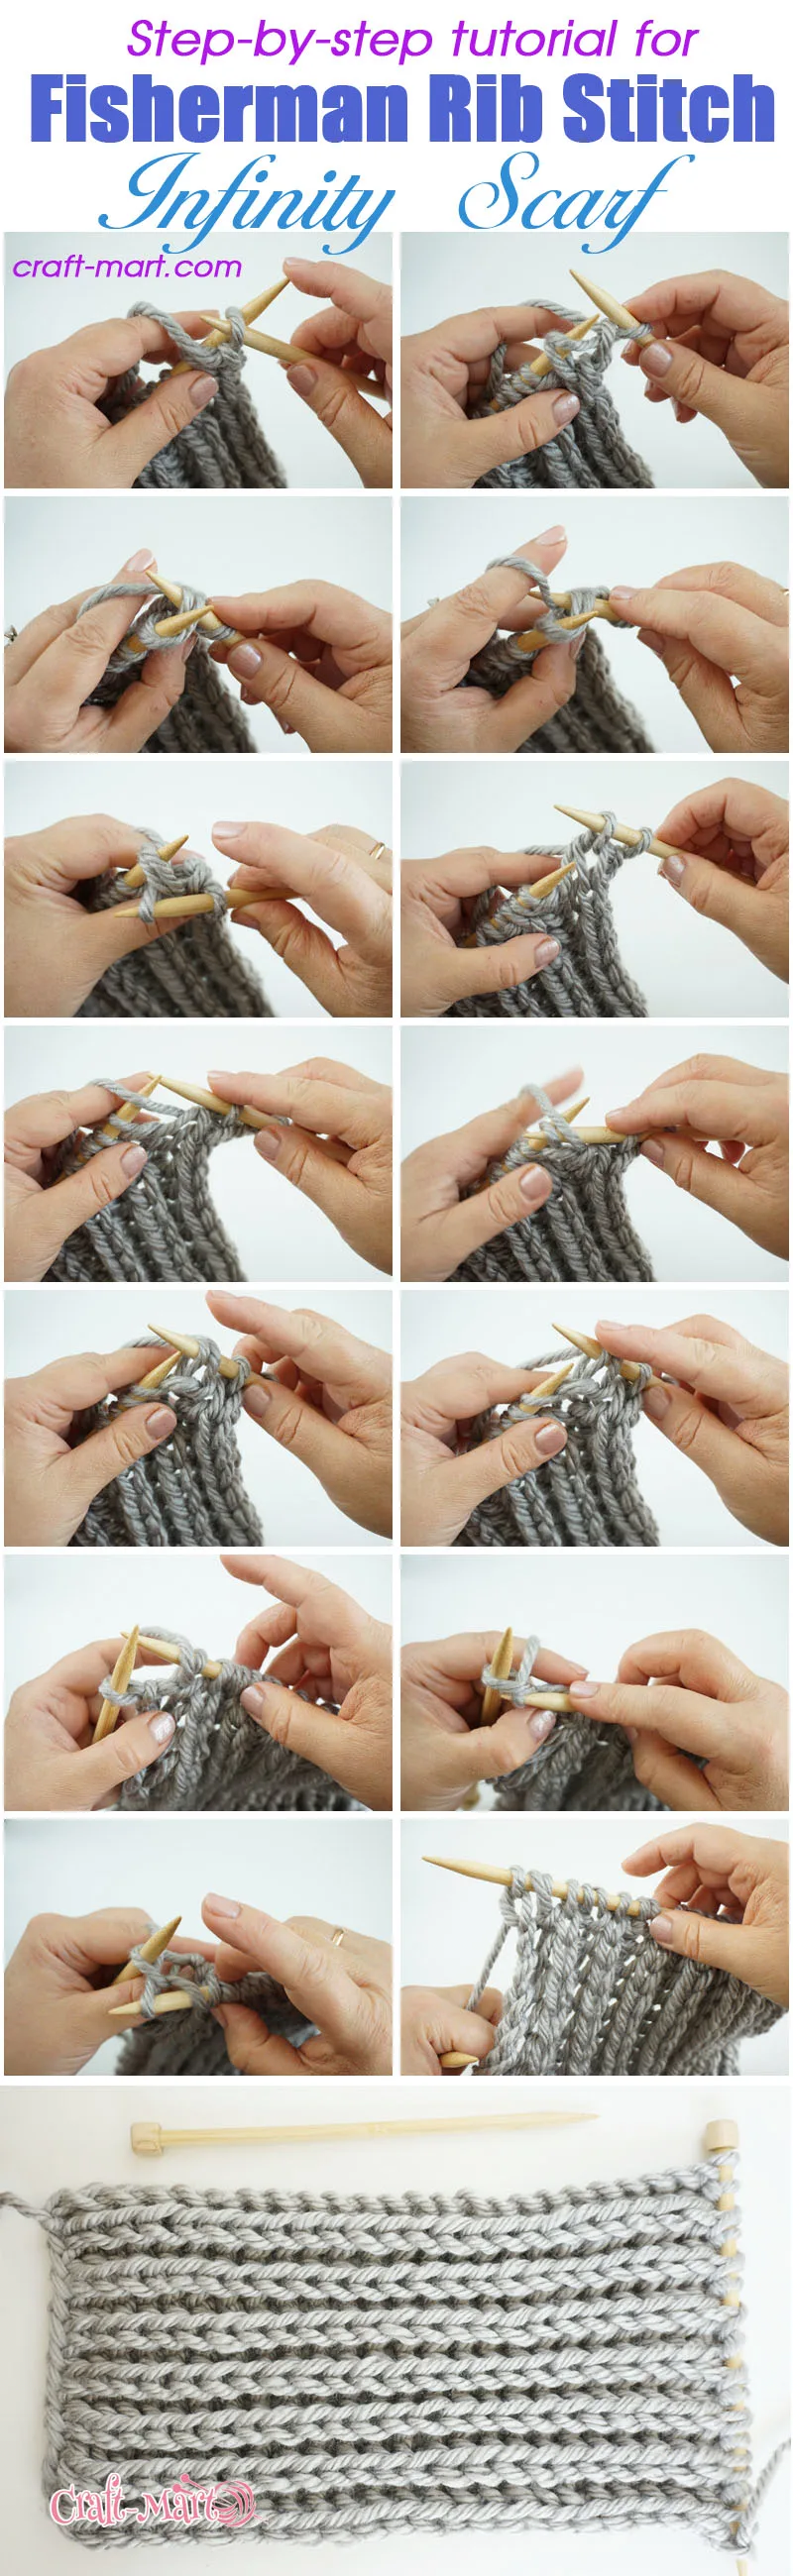
How to knit the Fisherman Rib Stitch
Start with casting on an even number of stitches very loosely (14-16 for a bulky infinity scarf, depending on your yarn type and size of needles). After you knit 10-20 rows of your pattern, you can always decide if this is the right width and reduce or increase the number of stitches to cast on.
The wider is your scarf, the more yarn your project will need for the same length. So, for detailed instructions on how to cast on stitches, please refer to our tutorial and video addressing cast-on techniques.
Hold the needle with your cast-on stitches in your left hand and your working needle in your right hand (it is empty). Wrap the yarn around your index finger and gently control it with 3 fingers of your left hand to create some slight tension.
The first stitch is an edge stitch that you simply slip – it makes a beautiful and neat chain stitch on the edge of your project.
We know, many other tutorials teach you to KNIT the first stitch – we disagree with this practice.
So, learn the way your grandma always did it for hundreds of years before us – slip the 1st edge stitch!
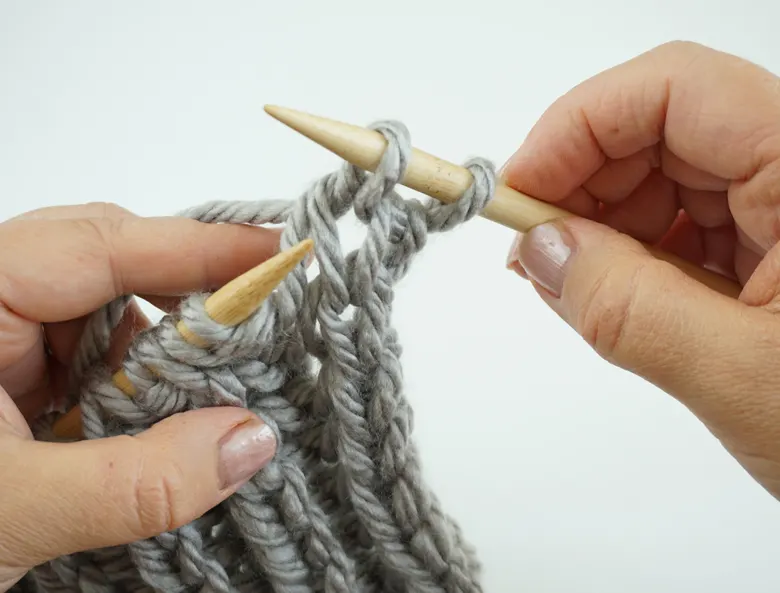
1st row (set row for the pattern for knitted infinity scarf)
Slip the first stitch from your left needle into the right needle.
K1: Insert the point of the right needle in the loop of the second stitch, draw yarn through the loop with the right needlepoint and then simply push the left needle with your right index finger to slip the underlying stitch off the left needle.
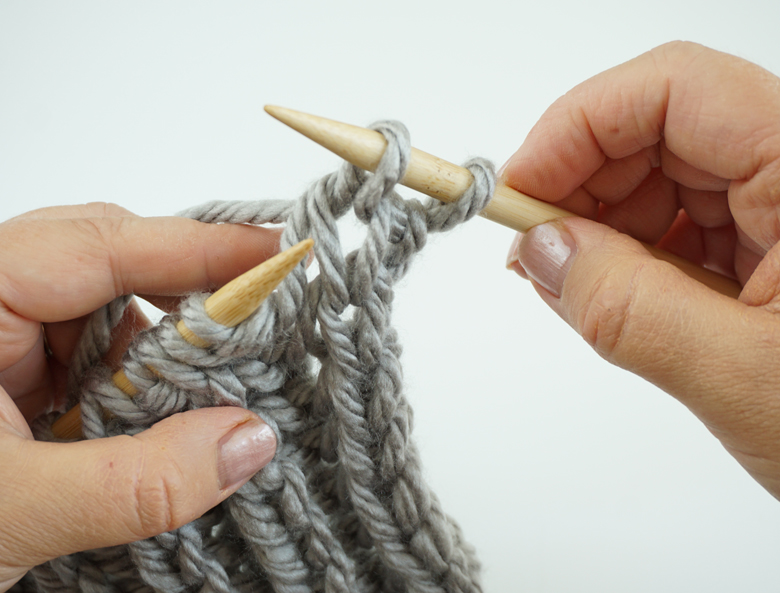
YOSl (Yarn Over Slip Stitch): Then put the yarn over your needle and simply slip the next stitch (with yarn over it) off purlwise without knitting it through. It is the easiest stitch in knitting!

2nd row (and the rest): Sl (slip stitch);
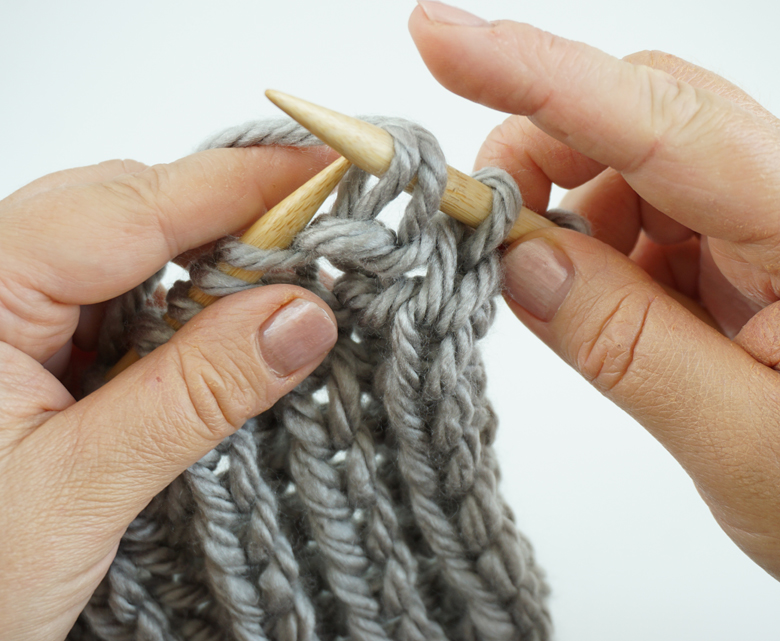
BK2tog: knit next stitch together with its paired yarnover – it is also called brioche knit 2 together, or ‘bark’
YOSl: put the yarn over your needle and simply slip the next stitch off purlwise, without knitting it;
K1 – knit the last stitch (edge).
Brioche Knit 2 Together
Turn your work over. Repeat 2nd row for the rest of the project until your scarf reaches the desired length.
Congratulations! That’s all it is – Fisherman’s rib is a very easy & fast knitting pattern.
Here it is in a nutshell, so you would always feel confident knitting a fisherman rib pattern. In summary, if you see a purl stitch, put the yarn over and slip it off. If you see a knit stitch with a yarn over, simply knit it together.
In fact, if you know how to do a knit stitch, you can create this beautiful 3-D textured rib that looks great.
Now you’ve learned the versatile rib pattern that you can use for a variety of easy and satisfying knitting projects. The versatility of this stitch is in the fact that it looks the same on both sides, making it the perfect stitch for two-sided simple knitting projects such as scarves, baby blankets, throws, etc.
We’ve included an infinity scarf knitting pattern below so you can master the knit stitch & slip stitch technique. Just a note: this rib pattern requires more yarn than your usual ribs.
So, overestimate the amount of yarn you would need so you don’t run out before you have a scar of the desired length. You can always use leftovers for a small dishcloth, doll scarf, or knit a small scarf for a furry friend.
Now you are ready to conquer other rib knitting patterns. For knitting help and tutorials refer to our website and upcoming Youtube channel.
Happy knitting!
Here is your FREE PATTERN for an infinity scarf.
To make an infinity scarf you will need the following:
Materials:
(3-4 medium) Red Heart Hygge Yarn: 290 yards (265 m) or any yarn of your choice
Bamboo knitting needles: 5.5 mm [US 9] (or bigger size for the bulkier scarf)
Abbreviations:
K – knit
SLYO – slip yarn over
BK2tog – knit the stitch with its paired yarn over
Instructions:
Cast on 16 stitches (or any even number of stitches).
Row 1: Slip 1st stitch, *K1; SLYO1*; (repeat* 7 times); K1
Row 2 and all remaining rows: Slip 1st stitch, *BK2tog; SLYO1* (repeat 7 times); K1 last stitch;
Repeat row 2 until your scarf reaches the desired length.
Bind off. Weave in ends. Connect the ends of the scarf to make a loop.
Congratulations, enjoy!
Happy infinity scarf knitting!
Save this step-by-step Fisherman’s rib knit stitch infinity scarf tutorial for future reference:

We hope you enjoyed this Rib knit stitch tutorial and your new infinity scarf.